Glowedge offers a powerful Comment Automation tool designed to enhance your social media engagement on Facebook and Instagram. This feature allows you to automate responses to comments made on your posts, streamlining your interaction with your audience.
How Comment Automation Works
Glowedge’s Comment Automation lets you create automated replies to comments left on your Facebook and Instagram posts. This feature helps you maintain consistent engagement with your followers, even when you’re not actively monitoring your social media accounts.
Setting Up Comment Automation in Glowedge
Follow these steps to set up Comment Automation:
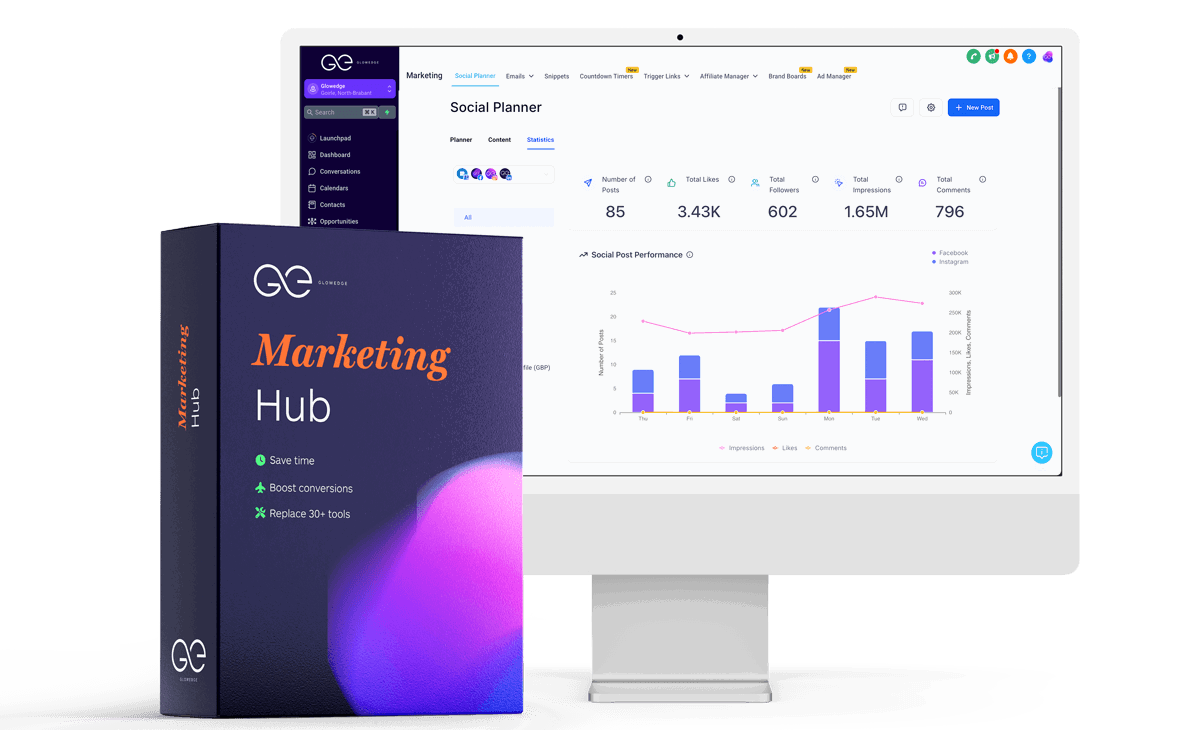
- Accessing the Feature: Log in to your Glowedge account. From the dashboard, navigate to the ‘Marketing’ section and select ‘Social Planner.’
- Connect Your Social Media Accounts: Ensure that your Facebook and Instagram accounts are connected to Glowedge. If not, you can link them by going to the ‘Integrations’ section and following the prompts to connect your accounts.

Creating Automated Responses:
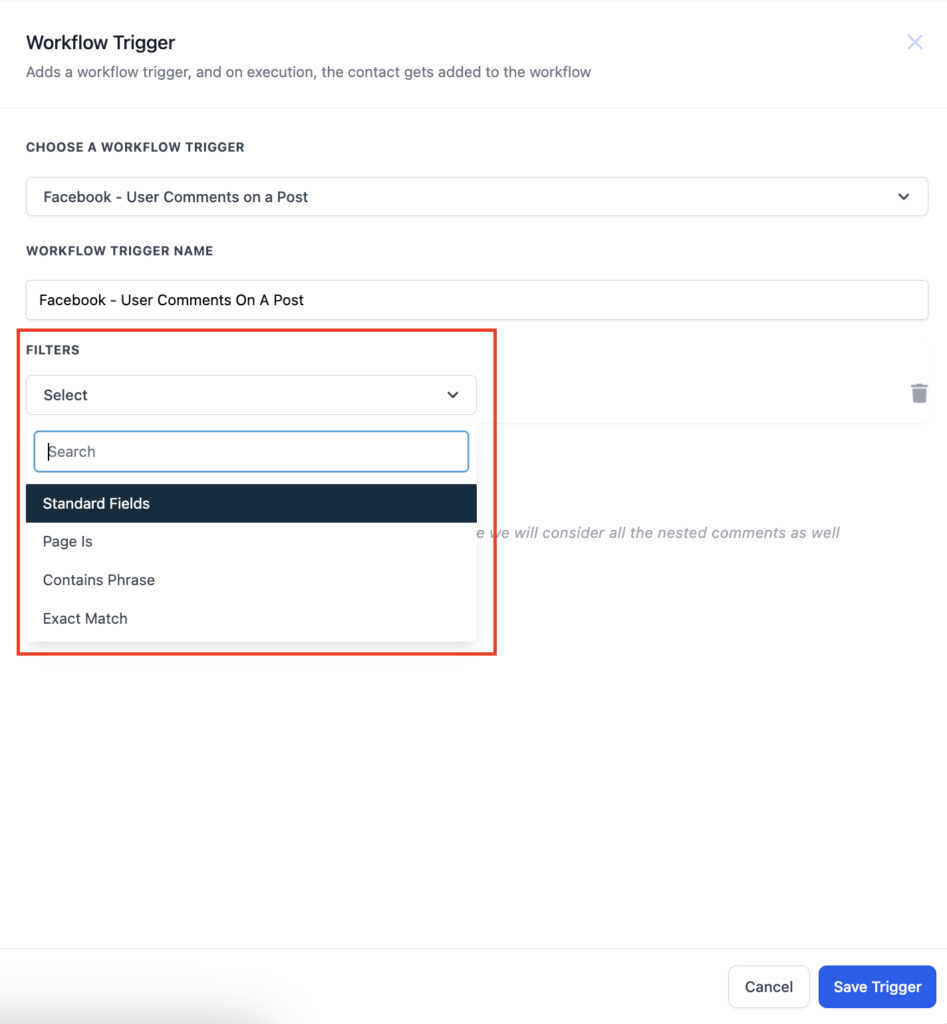
When setting up a workflow, select “Add Trigger.” You’ll find triggers for comment automation under the “Facebook/Instagram events” category. You can either search for the trigger directly or scroll down to locate the category.
- Facebook: User comments on a post
- Instagram: User comments on a post
1. Navigate to the triggers section and choose the trigger that best suits your needs.

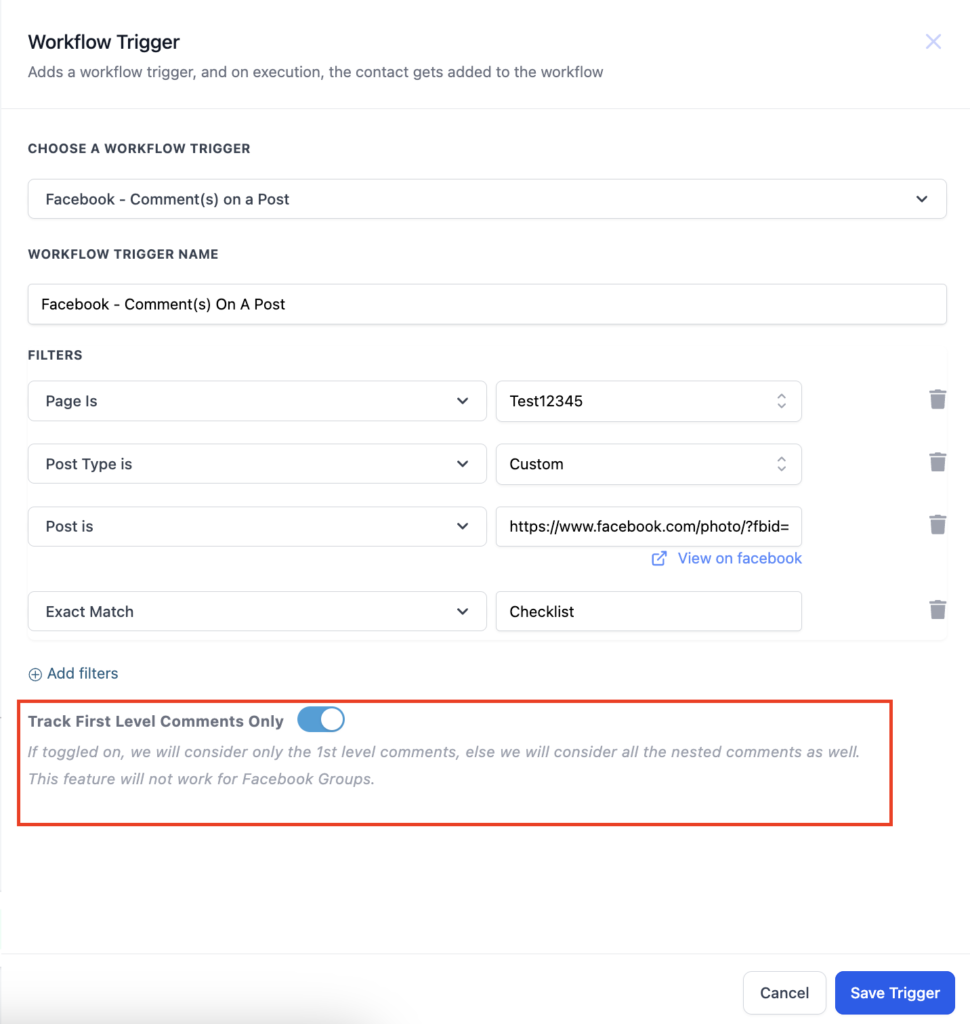
2. Once you click on the trigger, a sidebar will appear. You’ll find several filters here, and your first step is to choose the appropriate Page.


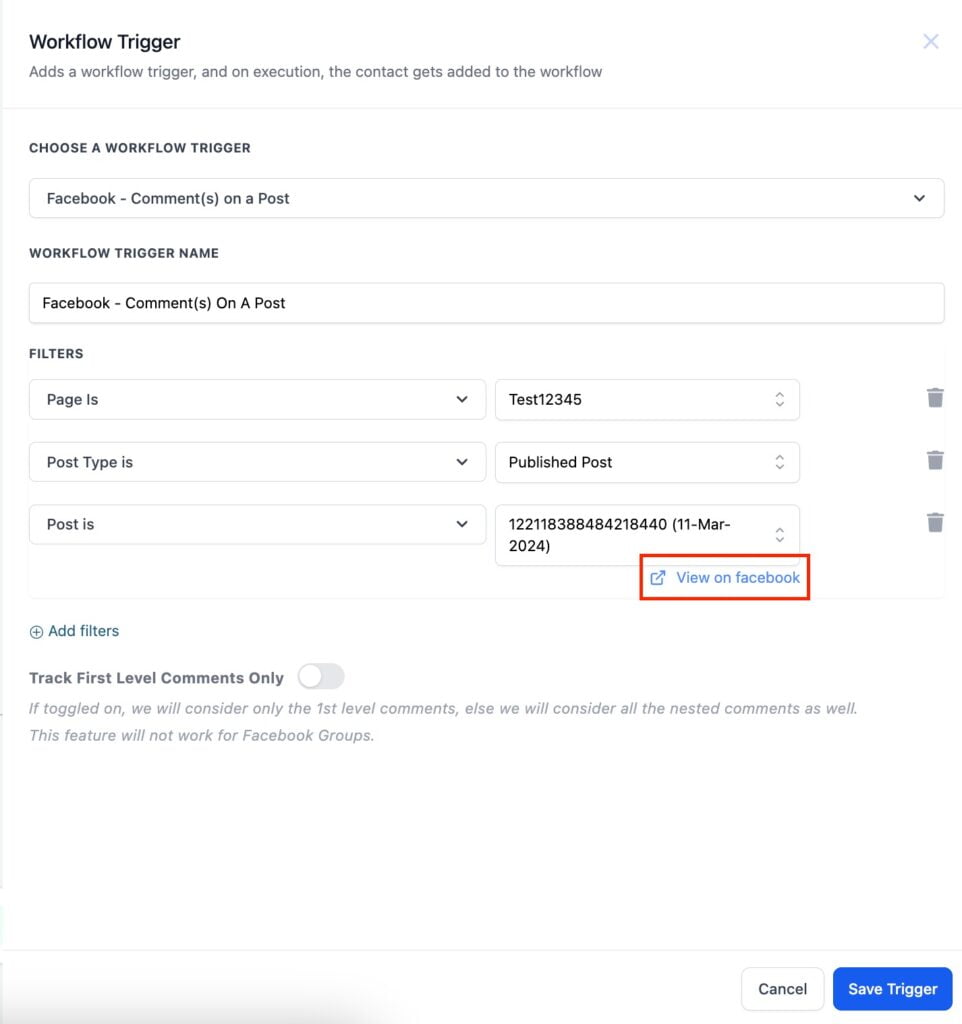
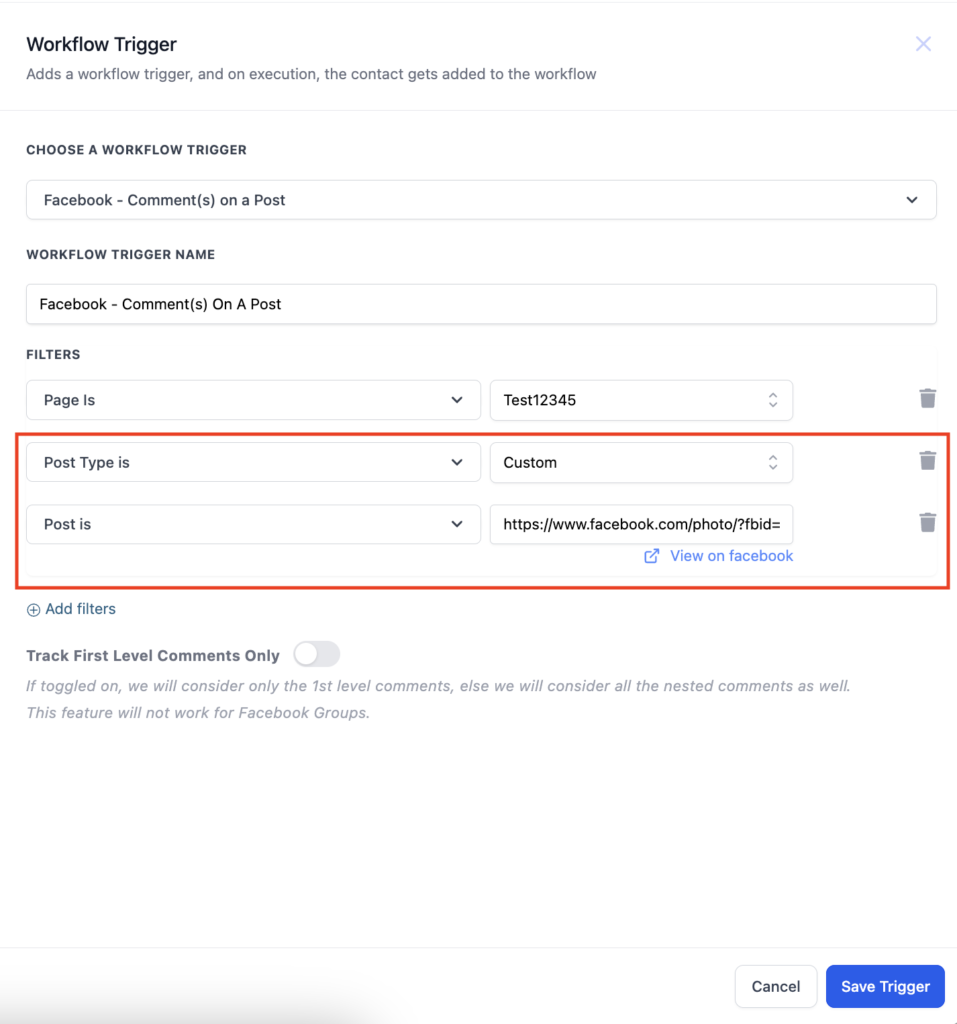
3. After selecting the Page you have to select the Post Type. Post type can be “Published” or “Custom”
a. Published Post – ‘Published Posts’ tab includes all posts on your business page – it could be text, photo, video or live video types of posts. You can also select the “View on Facebook” hyperlink to take you to the post.
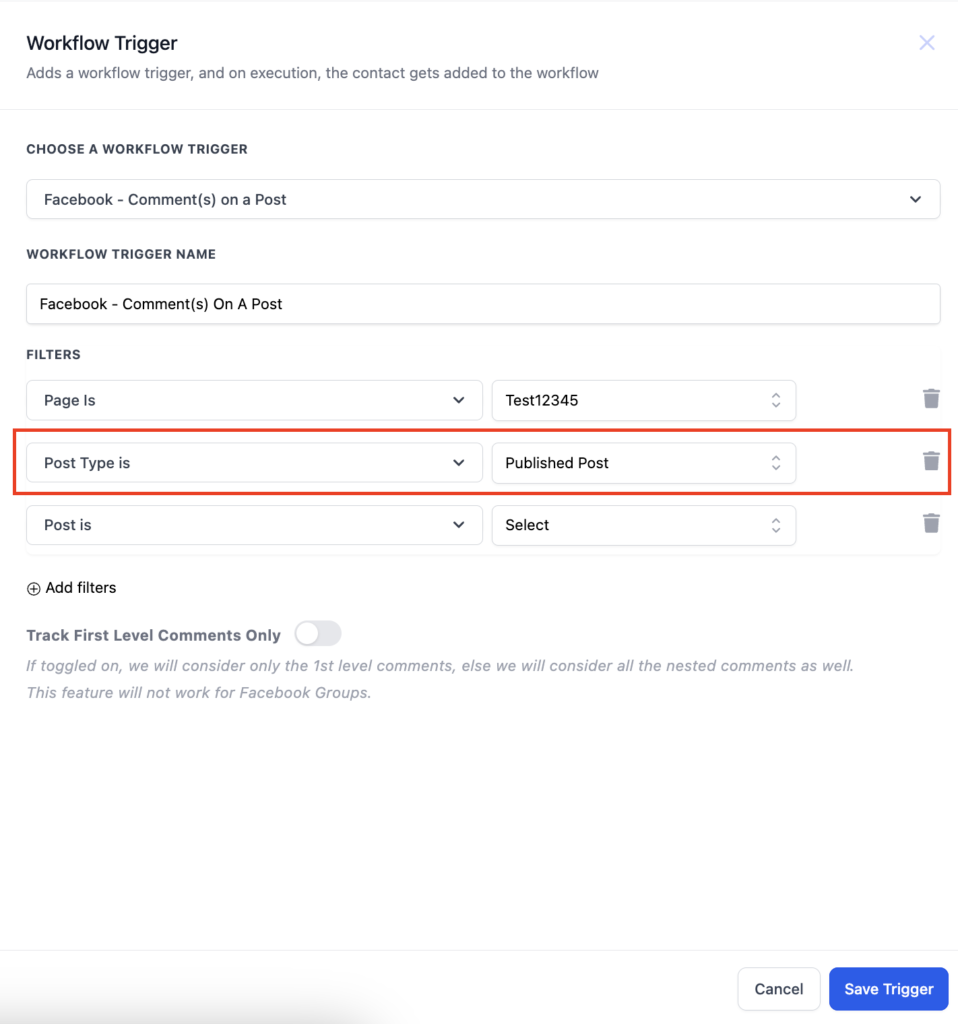
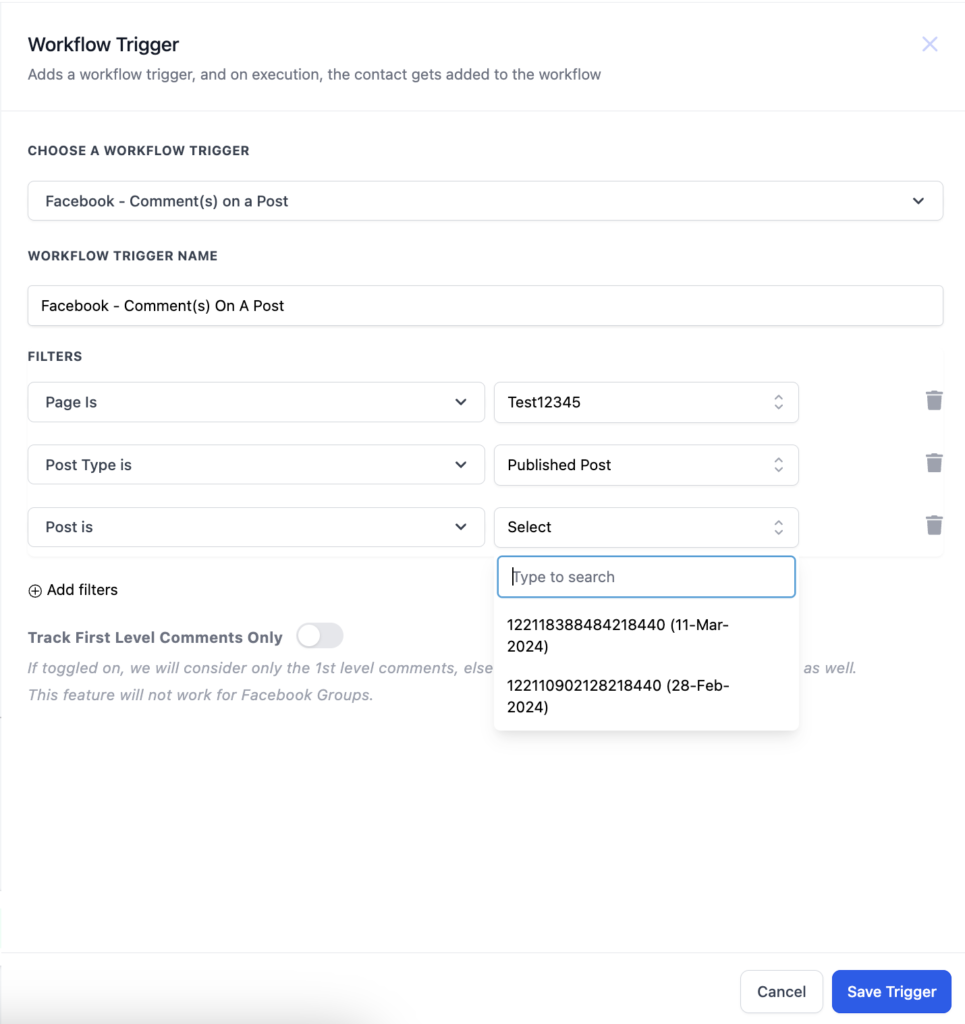
b. Custom Post – ‘Custom’ tab allows you to find and connect the post by entering the Facebook post’s URL or ID. Select Custom in Post type, add the “Post is” filter and paste the URL of the post in the field against Post is field.
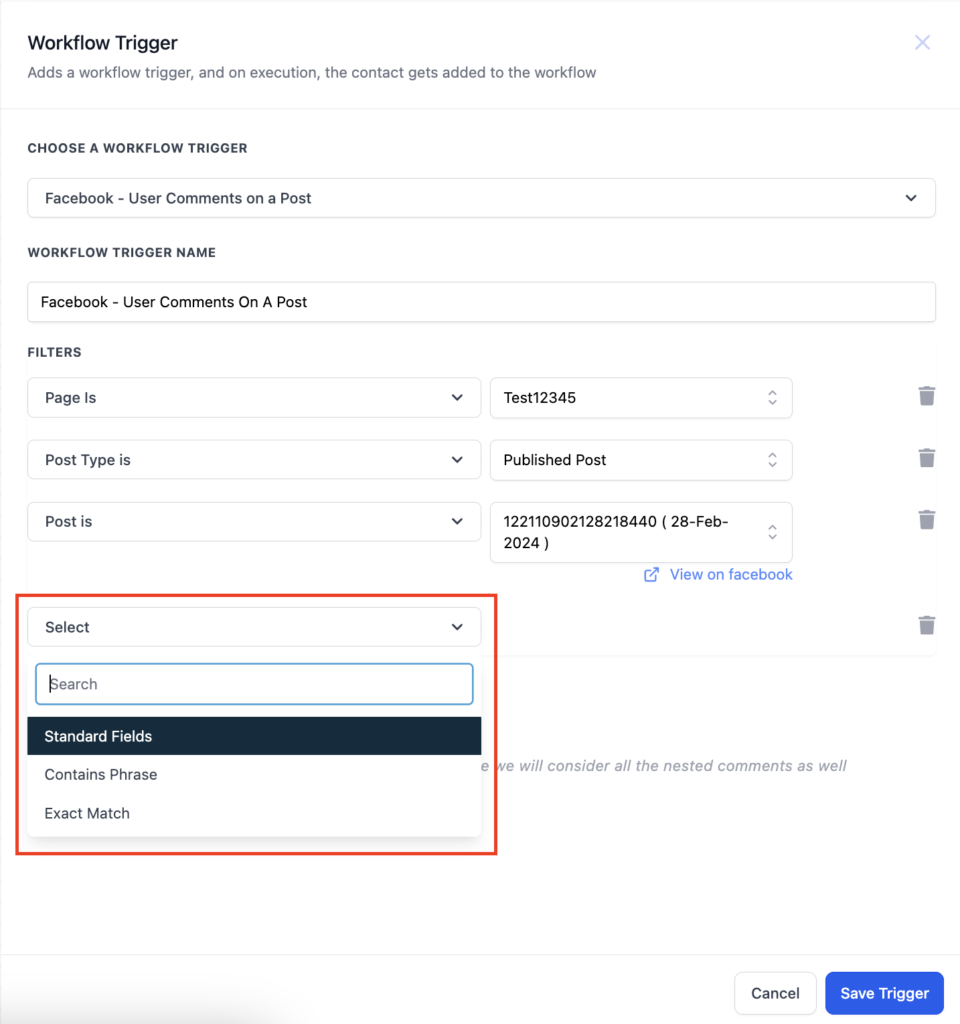
4. After selecting the post you have to define keywords that will trigger the response.
5. You can also use the toggle to turn on tracking of only first level comments. If this is turned on only first level of comments will trigger the workflow.
When will the contact be saved?
When a contact is triggered, it will be saved in the system, with the First Name and Last Name being stored.
What are the new Actions?
There are three new actions available in the “Communications” category:
- Facebook Interactive Messenger & Instagram Interactive Messenger.
- Selecting any of these actions will open a sidebar where you can capture all the necessary details.
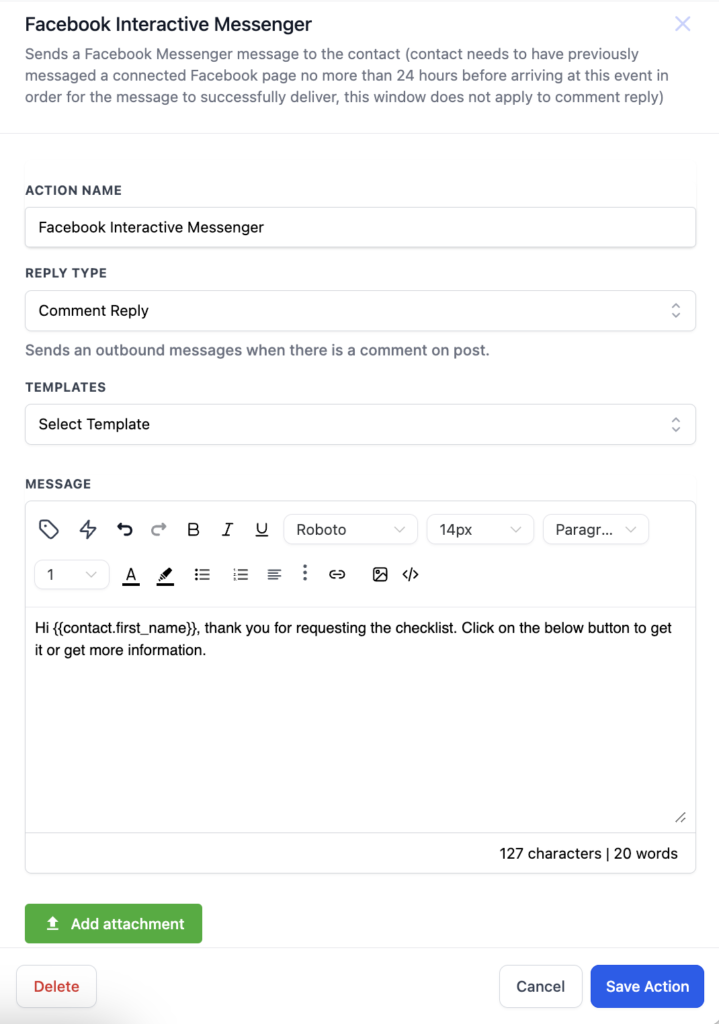
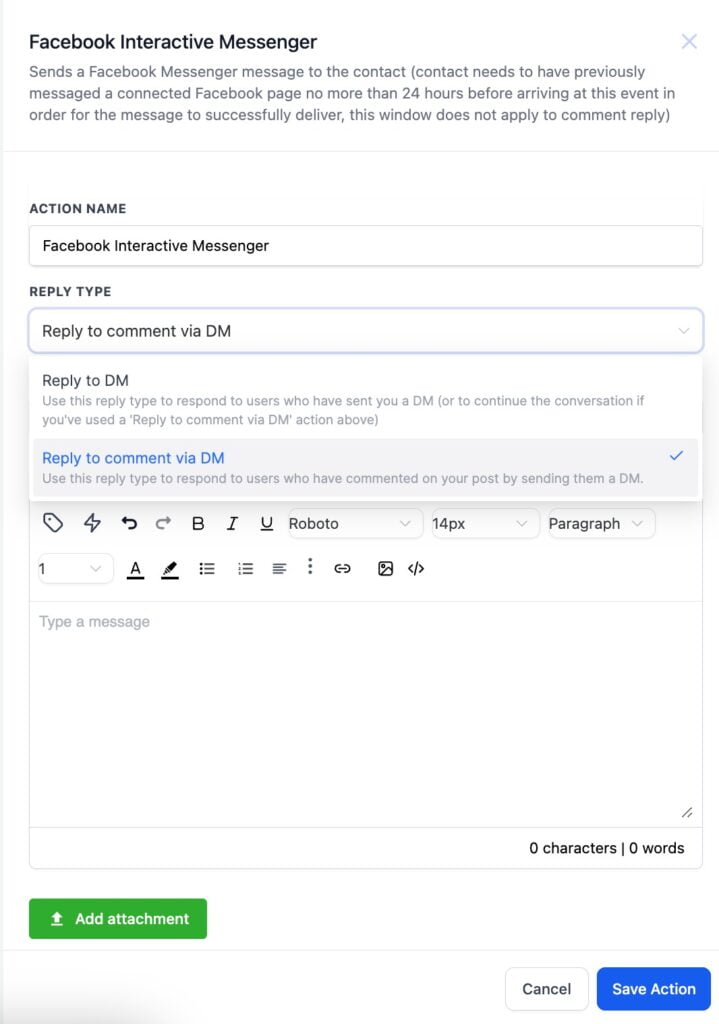
- The first step is to choose the “Reply Type.” You have two options: Reply to DM or Reply to Comment via DM.
- Reply to DM: Select this if you want to send an outbound message in response to a direct message received from the customer.
- Reply to Comment via DM: Choose this option if you want to send an outbound message based on a comment made by the customer. If you plan to use multiple actions in the same workflow, ensure the first action is “Reply to Comment via DM,” and any subsequent actions should be “Reply to DM.”
- Once you’ve chosen the reply type, the next step is to set up the message you want to send. You can either choose from existing templates or create your own message.
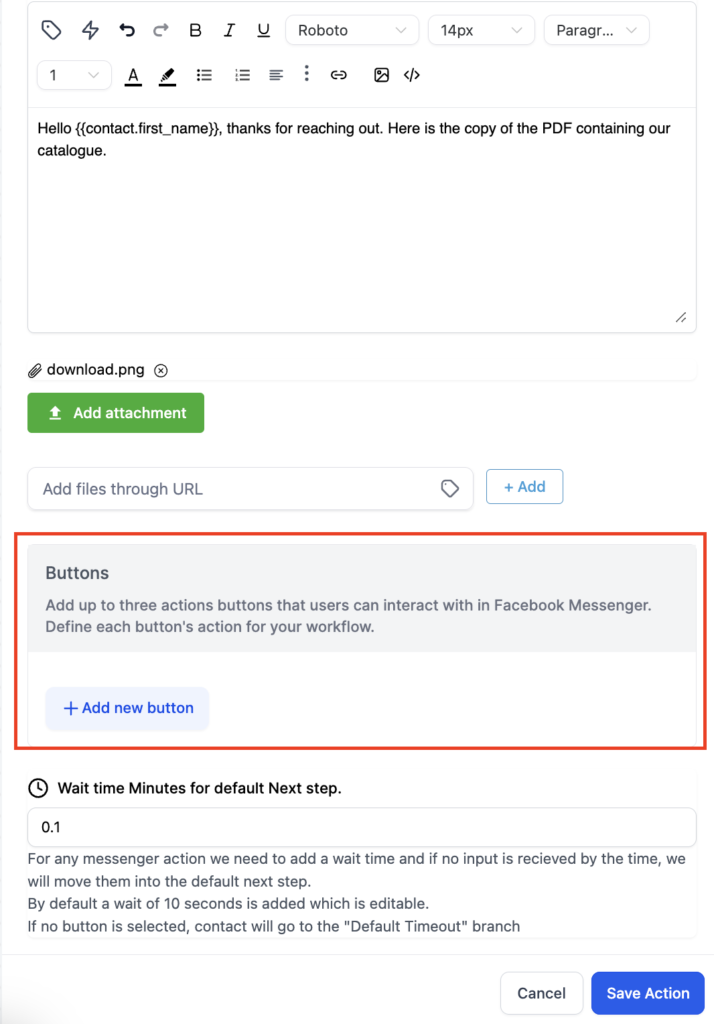
- Users can also attach files. To do this, click on “Add attachment,” then select a file from your drive or enter a URL to include the files.

5. You can also add buttons with your messages. Now what are buttons, buttons are a great way to communicate with your customers and gives you the functionality to perform actions based on the button selection, share your number or share the website link.
Click on “Add Button” to add the buttons, you can add upto 3 buttons.
- You can choose from three types of buttons:
- Open Website: Enter a URL for this button. When clicked, the user will be directed to the specified link.
- Call Number: Input a phone number here, allowing the user to make a call by clicking the button.
- Perform Actions: Use this button to advance the conversation with the customer. Additional actions can be added after this button to maintain the flow.
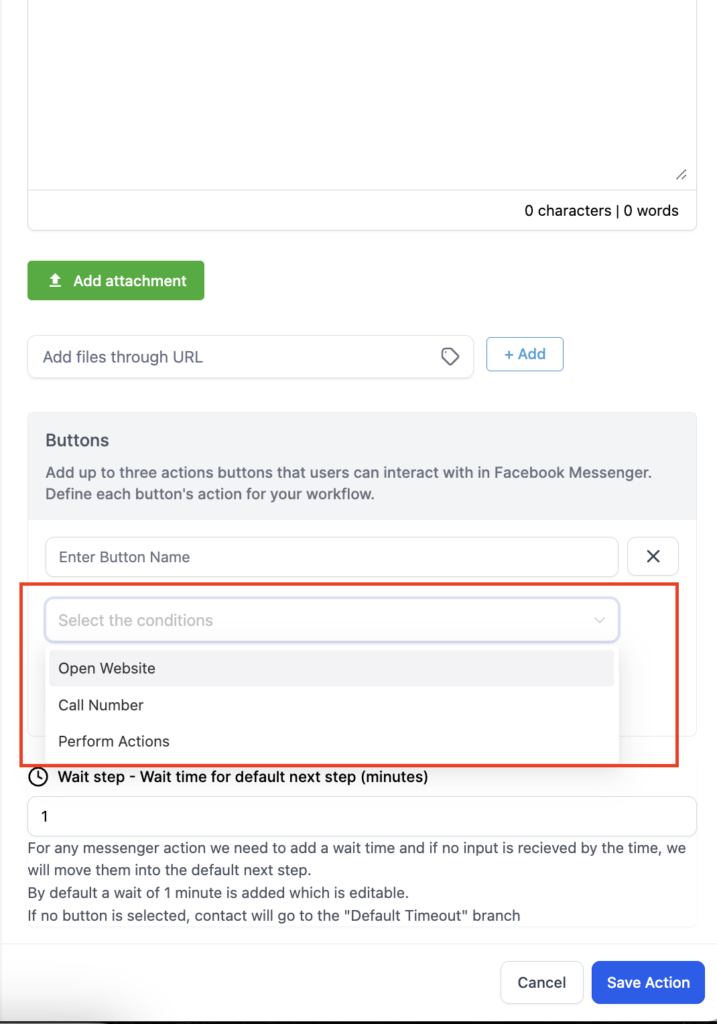
7. The first thing to be added in a button is the Button Name. Next is the selection from the 3 button types and last is entering the phone number or URL for Call or Website button respectively.

Default Wait Time: This step is required. A default wait time of 1 minute is automatically added but can be adjusted. Once the specified time has elapsed, the contact will proceed to the “Default Branch.”
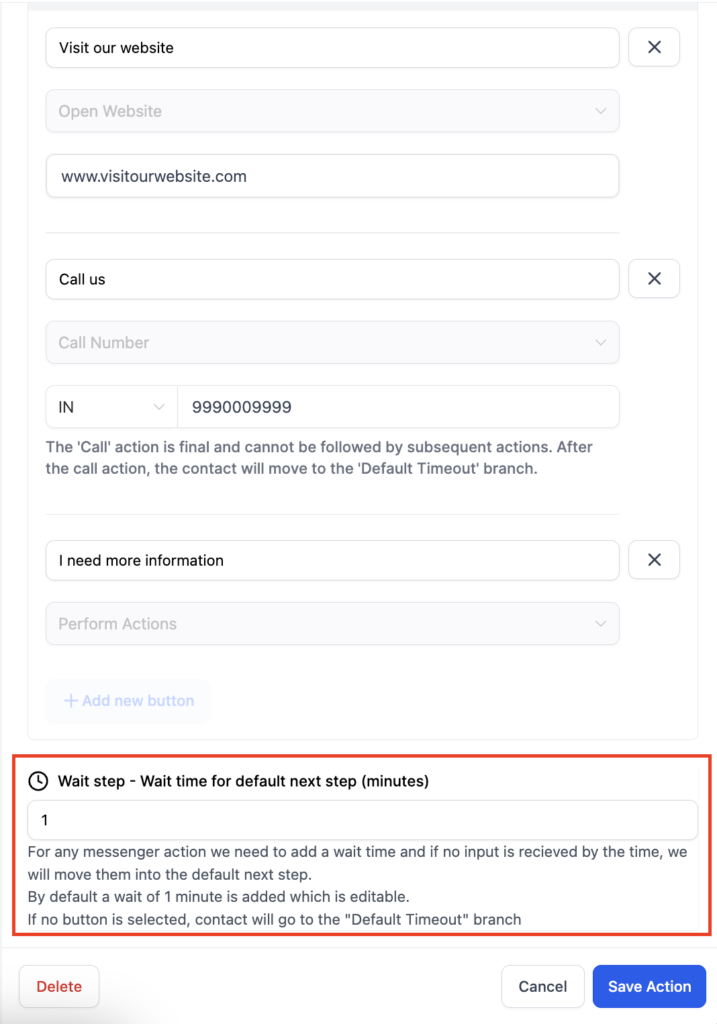
- Default Branch: The default branch is always available for the action. If the customer doesn’t respond or selects the “Call” action button, the contact will automatically move to this branch.
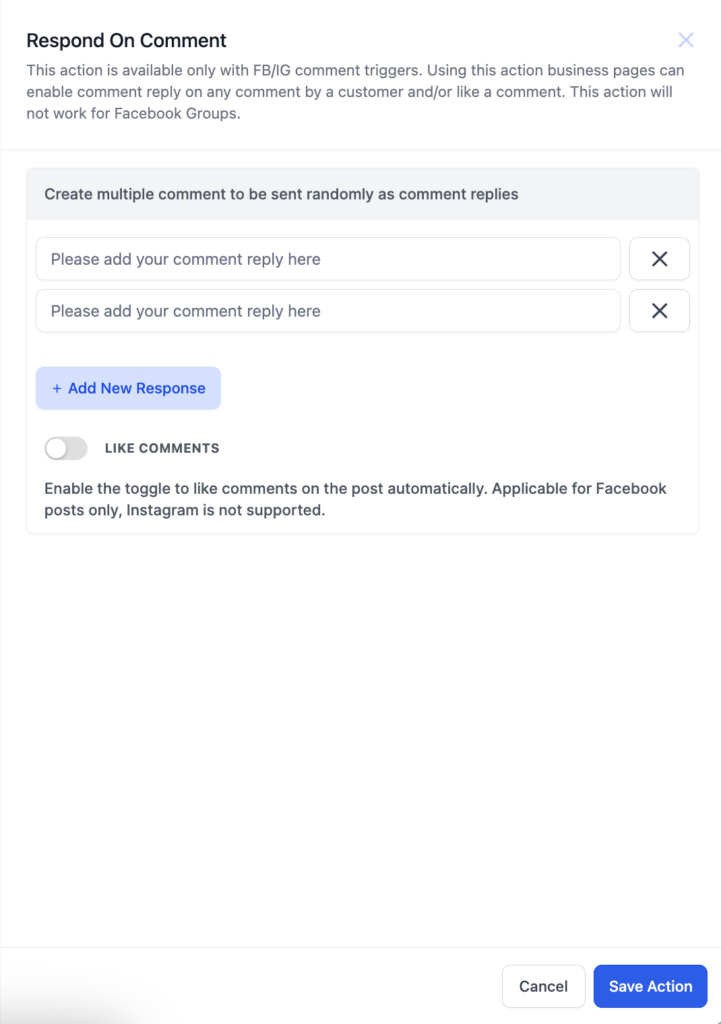
Respond to Comment Action
This action allows you to reply directly to a customer’s comment. You can create multiple reply options, and the system will randomly choose one to respond with. Additionally, there’s a toggle switch that, when enabled, will also like the comment.
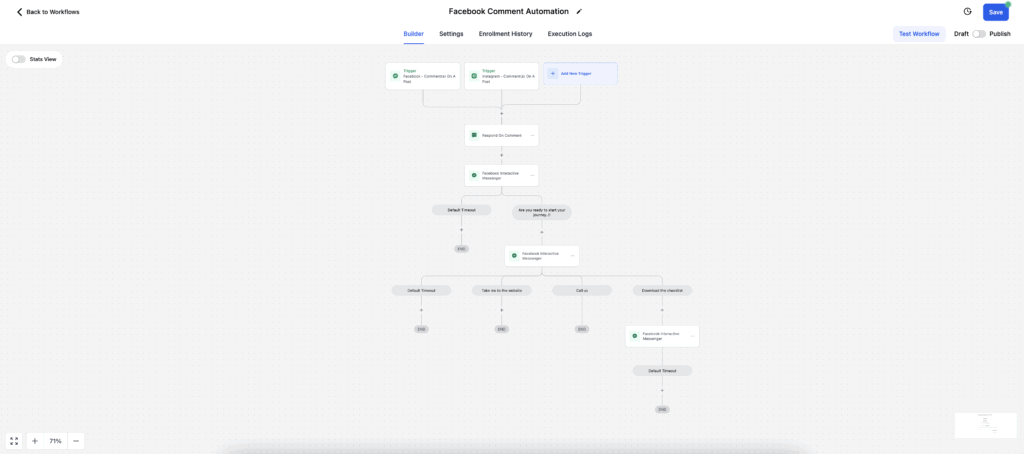
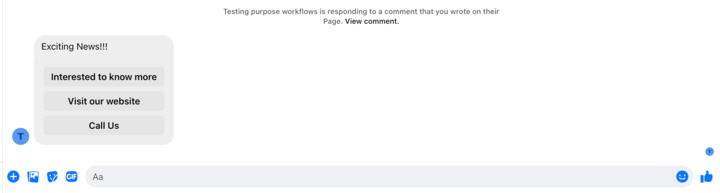
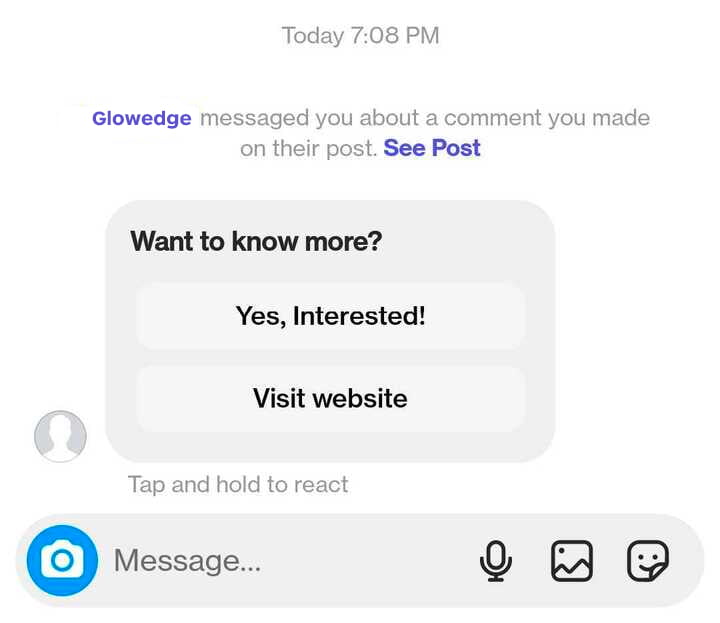
Here is how the workflow will look
Here is how the message will look in Facebook and Instagram
Managing Automated Responses
You can review and adjust your automated responses anytime through the ‘Comment Automation’ section. This flexibility allows you to tweak your engagement strategy as needed, ensuring your interactions remain relevant and effective.
Benefits of Using Glowedge’s Comment Automation
- Increased Engagement: Automated responses help you maintain an active presence on your social media channels, fostering better engagement with your audience.
- Time Efficiency: By automating responses, you save time that can be redirected to other important business tasks.
- Consistency: Ensure that all comments receive a response, providing a consistent experience for your followers.
Best Practices
- Personalization: While automation is powerful, ensure your responses feel personalized. Generic replies can sometimes alienate your audience.
- Regular Monitoring: Even with automation, it’s important to periodically check your posts to respond to any comments that may require a more nuanced or personal reply.
Glowedge’s Comment Automation is an essential tool for any business looking to boost their social media presence without overwhelming their team. Start using it today to see the difference it can make in your social media strategy.